
こんにちわ。
Lancers のバックエンドの開発と運用担当の こじま です。
みなさん,サーバをどのようにリモートしていますか?
直接,ターゲットのサーバへログインせず
SSH サーバを経由してリモートすることが多いと思います。
SSH サーバを構築することで
不要なリソース解放を防ぎ安全にインターネット経由でリモートできます。
今回は,そんな SSH サーバの構築例を紹介します。
AWS EC2 環境下で以下のような機能を盛り込みます。
※ Amazon Linux AMI 2014.03.2 (HVM) – ami-29dc9228 を利用
- ワンタイムパスワード認証
- 自動ログアウト
- アカウントロック
- コマンド実行履歴保存
- SSH ログイン通知(ChatWork株式会社様 chatwork を利用)
さっそく,サーバに SSH ログインして,構築を進めましょう。
まず,RPM パッケージのアップデート・インストールをします。
$ sudo sed -i ‘s/enabled=0/enabled=1/’ /etc/yum.repos.d/epel.repo
$ sudo yum -y update
$ sudo yum install -y git subversion screen emacs vim lv lynx sl curl zsh banner bind-utils lsof cowsay strace tcpdump mercurial make gcc pam-devel expect bash-completion
ログインメッセージをかえます。誤ったサーバログインを防ぐ事ができます。
/etc/motd を更新しても再起動時に上書きされるため
/etc/update-motd.d/30-banner を更新します。
バナーは “ascii banner generator” をキーワードに
ジェネレータツールサイトを検索して作成ください。
$ sudo vi /etc/update-motd.d/30-banner#!/bin/shversion=$(rpm -q --qf'%{version}'system-release)cat << EOF_| | __ _ _ __ ___ ___ _ __ ___| | / _\` |'_ \ / __/ _ \\ '__/ __|| |___| (_| | | | | (_| __/ | \\__ \\\_____/\\__/_|_| |_|\\___\\___|_| |___/https://aws.amazon.com/amazon-linux-ami/$version-release-notes/EOF
オペレーションミスを起こさないよう
プロンプトも分かりやすいものに変更します。
$ sudo vi /etc/profile.d/prompt.sh
PS1='(\[\033[31m\]PRD\[\033[m\])\[\033[36m\]\u\[\033[m\]@\[\033[32m\]\h:\[\033[33;1m\]\w\[\033[m\]\$ ‘
ランサーズではこんな感じのプロンプトです。
![]()
- 本番環境
- PRD
- ステージング環境
- STG
- テスト環境
- TEST
- 社内開発環境
- DEV
自動ログアウトするようにします。
$ sudo vi /etc/profile.d/tmout.shexport TMOUT=3600
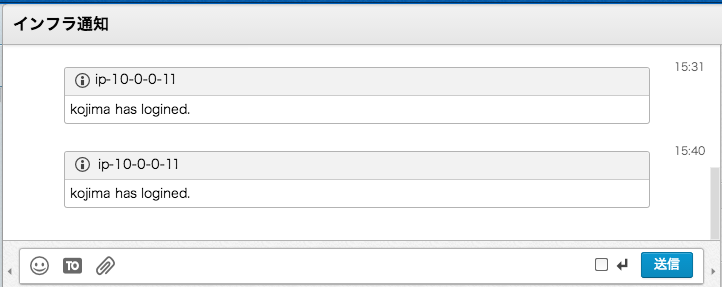
SSH ログインを chatwork に通知するようにします。
$ sudo vi /etc/ssh/sshrc
/usr/bin/curl --connect-timeout 5 -s -X POST -H"X-ChatWorkToken:<TOKEN>"-d"body=[info][title]$HOSTNAME - Login[/title]$USER has logined.[/info]""https://api.chatwork.com/v1/rooms/<room>/messages"> /dev/null
こんな感じの通知がきます。
ワンタイムパスワード認証の設定します。
$ wget https://google-authenticator.googlecode.com/files/libpam-google-authenticator-1.0-source.tar.bz2$ tar -jxvf libpam-google-authenticator-1.0-source.tar.bz2$ cd libpam-google-authenticator-1.0-source && make$ sudo make install$ sudoecho'auth required pam_google_authenticator.so'>> /etc/pam.d/sshd$ sudo vi /etc/ssh/sshd_config- #ChallengeResponseAuthentication yes- ChallengeResponseAuthentication no+ ChallengeResponseAuthentication yes+ #ChallengeResponseAuthentication no+ Port ????? <--- 1024 以降の番号にする。ポート変更時は AWS セキュリティポリシーの変更が必要です。+ Protocol 2+ PermitRootLogin no+ Banner none+ PasswordAuthentication no
アカウントロックの設定をします。
5回パスワードを間違えると180秒間アカウントロックされます。安心ですね
$ which pam_tally2/usr/sbin/pam_tally2 <--- pam_tally2 が存在することを確認$ sudo vi /etc/pam.d/sshd+ auth required pam_tally2.so deny=5 onerr=fail unlock_time=180ロック時の解除は以下の通り$ sudo pam_tally2 -u <user-id> --reset
コマンド実行履歴を保存するよう設定します。
$ sudo yum install -y psacct
$ sudo chkconfig psacct on$ sudo chkconfig –list psacct
psacct 0:off 1:off 2:on 3:on 4:on 5:on 6:off$ sudo /etc/init.d/psacct start
プロセスアカウントを開始中: [ OK ]
以下のようにユーザを限定して履歴参照やアカウント別利用統計も参照可能です。
$ sudo lastcomm --user <user-id>sl <user-id> pts/0 0.00 secs Thu Aug 14 08:53ls <user-id> pts/0 0.00 secs Thu Aug 14 08:53bash F <user-id> pts/0 0.00 secs Thu Aug 14 08:53id <user-id> pts/0 0.00 secs Thu Aug 14 08:53$ sudo sa -mroot 610 275703.50re 0.08cp 22134k<user-id1> 64 2.41re 0.00cp 28133k<user-id2> 32 0.12re 0.00cp 28133k<user-id2> 32 0.10re 0.00cp 27304ksshd 7 3.10re 0.00cp 19824kpostfix 6 2336935.38re 0.00cp 22197k
アカウントにワンタイムパスワードを設定します。
$ sudo passwd <user-id>$ sudo su - <user-id>$ google-authenticatorgoogle-authenticatorDo you want authentication tokens to be time-based (y/n) yhttps://www.google.com/chart?chs=200x200&chld=M|0&cht=qr&chl=otpauth://totp/user-id@hostname%3Fsecret%Yournewsecret key is: ??????Your verification code is ??????Your emergency scratch codes are:??????????????????????????????Do you want me to update your"/user-id/.google_authenticator"file (y/n) yDo you want to disallow multiple uses of the same authenticationtoken? This restricts you to one login about every 30s, but it increasesyour chances to noticeoreven prevent man-in-the-middle attacks (y/n) yBydefault, tokens are goodfor30 secondsandin order to compensateforpossible time-skew between the clientandthe server, we allow an extratoken beforeandafter the current time. If you experience problems with poortime synchronization, you can increase the window from itsdefaultsize of 1:30min to about 4min. Do you want todoso (y/n) yIf the computer that you are logging into isn't hardened against brute-forcelogin attempts, you can enable rate-limitingforthe authentication module.Bydefault, this limits attackers to no more than 3 login attempts every 30s.Do you want to enable rate-limiting (y/n) y
今日はここまでです。以上で構築完了です 。
今回の構築で,安全にどこからでもリモートできるようになりました。
Lancers では,徹底したユーザ第一主義を行動指針の一つに掲げ
発注者様、受注者様、運営メンバーを含めた三者にとっての
win-win-win を創り出すことを徹底的に第一に考えます。
見えにくい部分ではありますが,Lancers のバックエンドは
ユーザ第一主義に基づき,こうした小さな環境構築から
努力の積み重ね,日々,サービス品質の向上を目指しています。
以上,Lancers のバックエンドを支える,こじま からでした。
機会があればまた紹介させて頂きます!